Some links in this guide are affiliate links, if you buy through them we may earn a small commission at no extra cost to you. Here’s our disclosure.
Quick Answer
To organize a pantry, work in five steps: empty every shelf, sort and toss expired items, group what's left into zones (breakfast, baking, grains, canned, snacks, cooking basics), contain loose items in clear bins, and label each zone so the system lasts. Print free labels to keep it cohesive.
You open the pantry to grab one thing and a bag of rice slides off the shelf. Somewhere behind the cereal boxes are two half-empty bags of the same pasta, a can of beans that expired last spring, and the baking powder you swore you were out of, so you bought another. Every meal starts with a small excavation, and every grocery trip includes something you already own but couldn't see. It isn't that you don't try. You wipe the shelves, you push things around, and within two weeks it's a jumble again. The problem isn't effort or willpower. It's that a pantry without a system has no home for anything, so items land wherever there's a gap and vanish the moment the door closes. When you can't see what you have, you can't plan meals, you can't shop smart, and you definitely can't cook without a hunt.
How do you organize a pantry step by step?
Good pantry organization follows five steps, in order: empty, sort, zone, contain, and label. First, take everything out so you can see what you actually own, this alone surfaces the duplicates and expired items hiding in the back. Second, sort as you go: toss anything past date, group like with like, and set aside things that don't belong in the pantry. Third, assign zones so every category has a dedicated spot. Fourth, contain loose items in bins and jars so bags stop collapsing and small packets stop migrating. Fifth, label every zone and container so the system survives everyone else in the house. The order matters, most people jump straight to buying bins before they've sorted, which just organizes clutter they should have tossed. Do the unglamorous emptying and sorting first, and the containing and labeling take a fraction of the time. Work one shelf at a time if the whole pantry feels like too much.
Give yourself a real surface to sort on, the kitchen table or an island, and keep a trash bag and a donate box within reach so decisions happen fast. Wipe each shelf while it's empty; it's the only time you'll have clear access. Then bring items back zone by zone rather than shelf by shelf, so related things end up together from the start instead of scattered.
How should you zone a pantry so everything has a home?
Zoning is the backbone of pantry organization: group items into a handful of clear categories and give each one a fixed shelf or section. The goal is that anyone, you, your partner, a kid tall enough to reach, can find and return an item without asking. Put everyday items at eye level, heavy or bulk items on the bottom, and rarely used things up high. Here's a simple zone map that works for most kitchens:
| Zone | What goes here |
|---|---|
| Breakfast | Cereal, oats, coffee, tea, spreads |
| Baking | Flour, sugar, baking soda, extracts |
| Grains & pasta | Rice, pasta, noodles, quinoa |
| Canned goods | Soups, beans, tomatoes, vegetables |
| Snacks | Crackers, chips, granola bars, nuts |
| Cooking basics | Oils, sauces, spices, broth |
Keep a small "eat first" bin at the front for items nearing their date so nothing gets buried and wasted. Once each zone has a home, restocking becomes obvious, the empty spots show you exactly what to buy.
Why do printable pantry labels make organization stick?
Labels are what turn a one-time tidy into a system that lasts, because they tell everyone in the house where things belong. Without labels, your careful zones erode within a week, someone slides the crackers in with the canned goods, and the whole logic quietly collapses. A clear label on each bin and shelf removes the guesswork: there's a spot for pasta, it's marked, so pasta goes back there every time. Printable pantry labels also make the space look calm and cohesive, which sounds cosmetic but matters, a pantry that looks organized is one people are more likely to keep organized. Use them on clear bins, decanted jars, and shelf edges. Matching labels also disguise mismatched packaging, so the store-brand and name-brand versions of the same item read as one tidy category. The best part: printable labels cost nothing, and you can reprint them the moment your zones change.
For labels that survive real kitchen life, print them on sticker paper or slip printed cards into clip-on bin tags so they wipe clean and peel off without residue. Place each label on the front face at eye level, and keep the wording broad, "Snacks," not "Granola Bars", so the category still fits when the contents rotate. Grab the free label set below and start with your busiest three zones.
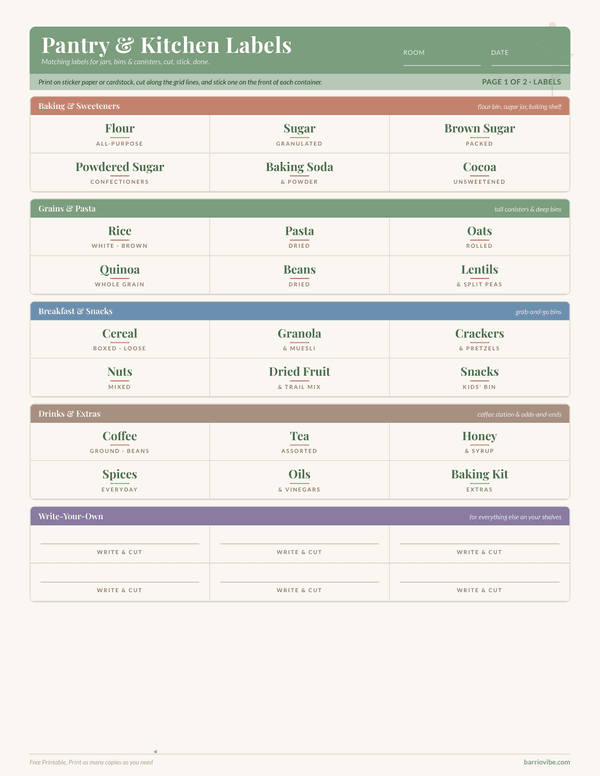
Pantry & Kitchen Labels, Free Printable
A free printable set of pantry and kitchen labels for jars, bins, and canisters, plus a cabinet zone map to plan where everything goes. Print on sticker paper or cardstock, cut, and stick.
What containers and bins do you actually need?
You need far fewer containers than pantry inspiration photos suggest. Start with the one category that does the most work: a set of clear, stackable bins. They corral loose packets, snack bars, seasoning mixes, tea, into a single grab-and-go unit, and they make the back of a deep shelf reachable because you just pull the whole bin forward. Decant staples like flour, sugar, and rice into whatever sealed containers you already own to keep them fresh and visible. Measure your shelf depth and height before buying anything; the most common mistake is buying beautiful bins that don't fit. Skip specialty organizers at first, a lazy Susan for oils and a tiered shelf for cans cover most needs. Buy your bins in one finish so the pantry reads as a set, and add more only once you know what's genuinely short. Remember that containers organize; they don't declutter, so sort first.
One more rule of thumb: leave a little breathing room in every bin. A container packed to the brim is one people stop putting things back into, which is how zones unravel. Aim to fill each bin about three-quarters full so there's always space to drop the next box in, and the system keeps working long after the initial reset.
How do you keep a pantry organized long-term?
Good pantry organization is a habit, not an event, and it comes down to three small routines, not another big overhaul. First, do a two-minute reset when you unload groceries: put new items behind older ones (first in, first out) so nothing expires in the back. Second, keep a running list, a notepad or app on the door, and jot items the moment they run low, which ends duplicate buying for good. Third, do a quick zone check once a month: pull anything that drifted out of place and toss what's expired. Because your zones are labeled, resetting takes minutes instead of hours. The same logic extends to the rest of your kitchen, once the pantry clicks, our kitchen cabinet organization guide helps you carry the zone-and-label system into your cupboards. Maintenance is the whole game: a labeled system you tidy for two minutes a week beats a perfect overhaul you redo every season.
What's the easiest way to organize a pantry on a budget?
The most budget-friendly way to organize a pantry starts with sorting and labeling, both free, before you spend a cent on bins. Empty and declutter first; you'll often free up so much space that you need far fewer containers than expected. Shop your own home for bins: shoeboxes, baskets, and jars you already have work fine while you learn your zones. Dollar stores carry clear bins, can risers, and lazy Susans for a fraction of boutique prices, and printable labels give you that cohesive, expensive look for nothing. Decant into mismatched jars now and upgrade to a matching set later, if ever. If you want more quick, low-cost wins throughout the kitchen, these kitchen organizing hacks stretch the same dollar further. The point is that an organized pantry is built on a system, not a shopping spree, the labels and zones do the heavy lifting, and those cost almost nothing.
Pantry & Kitchen Labels, Free Printable
A free printable set of pantry and kitchen labels for jars, bins, and canisters, plus a cabinet zone map to plan where everything goes. Print on sticker paper or cardstock, cut, and stick.
Print the labels, zone one shelf at a time, and let the marked spots do the remembering. A pantry you can see is a pantry you can actually use, and it stays that way on two minutes a week.
Frequently Asked Questions
How do you organize a pantry with deep shelves?
Use clear, pull-out bins so you can reach the back without unloading the front, group loose items by category in each bin and pull the whole bin forward. Put everyday items at eye level, bulk on the bottom, and rarely used things up high so nothing gets stranded.
What order should you organize a pantry in?
Empty, sort, zone, contain, then label, in that order. Emptying reveals duplicates and expired food, sorting removes what you don't need, zoning gives each category a home, containers tame loose items, and labels keep the whole system in place for everyone.
Where should you put pantry labels?
Place labels on the front face of each bin and along shelf edges at eye level. Keep the wording broad, like 'Snacks' rather than 'Granola Bars,' so the category still fits when contents rotate. Sticker paper or clip-on tags let labels wipe clean and move easily.
How do you organize a pantry on a budget?
Start with the free steps, sorting and labeling, before buying anything. Shop your own home for baskets and jars, use dollar-store clear bins and can risers, and print free labels for a cohesive look. Decant into mismatched containers now and match them later, if ever.
How do you keep a pantry organized after cleaning it out?
Do a two-minute reset when you unload groceries: put new items behind older ones so nothing expires in back. Keep a running low-stock list on the door to stop duplicate buying, and do a quick monthly zone check to return strays and toss expired items.